As a VADE Battery engineer specializing in custom rechargeable battery solutions, I’m excited to share our expertise on testing mobile phone battery voltage. This crucial skill helps diagnose battery health and optimize device performance. Let’s follow the step-by-step process demonstrated by Vade Battery manufacturer, with additional insights from our experience in lithium-ion, LiFePO4, and custom battery pack manufacturing.
เครื่องมือและวัสดุที่จำเป็น
- มัลติมิเตอร์
- แบตเตอรี่โทรศัพท์มือถือ
วิธีการแบบทีละขั้นตอน
ขั้นตอนที่ 1: ตั้งค่ามัลติมิเตอร์สำหรับอุปกรณ์ที่ไม่ได้ปรับขนาด
If you’re using a multimeter without scales as shown in the image, simply set the dial to the DC voltage position. This setting is suitable for most basic voltage measurements of mobile phone batteries.
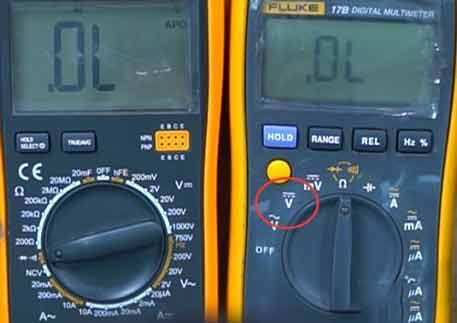
เคล็ดลับจากมืออาชีพ: ที่ VADE Battery เราใช้มัลติมิเตอร์ที่มีความแม่นยำสูงสำหรับ กระบวนการผลิตแบตเตอรี่ลิเธียมที่กำหนดเองเพื่อให้แน่ใจว่าการอ่านค่าจะแม่นยำทุกครั้ง
ขั้นตอนที่ 2: ปรับมัลติมิเตอร์แบบสเกล
สำหรับมัลติมิเตอร์ที่มีมาตราส่วน ให้ตั้งหน้าปัดเป็นแรงดันไฟ DC 20V ช่วงแรงดันไฟนี้ครอบคลุมแบตเตอรี่โทรศัพท์มือถือส่วนใหญ่ ซึ่งโดยทั่วไปจะทำงานต่ำกว่า 20V
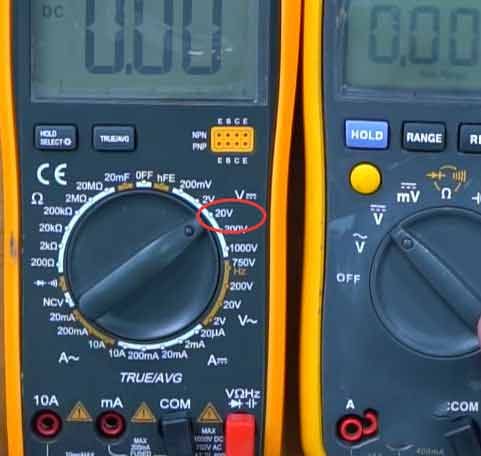
บันทึก: ของเรา แบตเตอรี่ 18650 ได้รับการทดสอบภายในช่วงนี้เพื่อให้มั่นใจถึงประสิทธิภาพที่เหมาะสมที่สุด
ขั้นตอนที่ 3: ระบุขั้วของโพรบ
ขั้นตอนต่อไปคือทำความคุ้นเคยกับหัววัดทดสอบ ดังที่แสดงในภาพ หัววัดสีแดงเป็นขั้วบวก และหัววัดสีดำเป็นขั้วลบ รหัสสีนี้เป็นมาตรฐานสำหรับมัลติมิเตอร์ส่วนใหญ่ และมีความสำคัญอย่างยิ่งต่อการวัดที่แม่นยำ
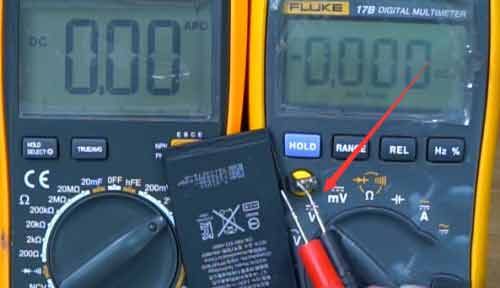
คำเตือนด้านความปลอดภัย: จัดการหัววัดด้วยความระมัดระวังเสมอเพื่อหลีกเลี่ยงไฟฟ้าลัดวงจร ซึ่งเป็นแนวทางปฏิบัติที่เราปฏิบัติตามอย่างเคร่งครัด การทดสอบโหลดแบตเตอรี่ ขั้นตอนการดำเนินการ
ขั้นตอนที่ 4: เชื่อมต่อหัววัดกับขั้วแบตเตอรี่
Carefully touch the probes to the battery’s terminals, as demonstrated in the image. Ensure proper contact with the positive and negative terminals.
การปรับปรุง: ก่อนทำการทดสอบ ให้ทำความสะอาดขั้วแบตเตอรี่ด้วยแอลกอฮอล์ไอโซโพรพิล วิธีปฏิบัตินี้ที่เราใช้ การปรับสมดุลเซลล์ LiFePO4 ขั้นตอนการทำงานทำให้มั่นใจได้ว่าการอ่านค่าจะแม่นยำ
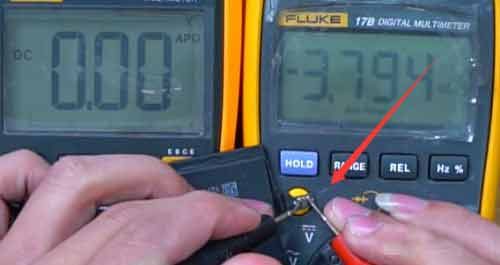
ขั้นตอนที่ 5: สังเกตการอ่านค่าแรงดันไฟฟ้าเชิงลบ
If you’ve connected the probes incorrectly, you’ll see a negative voltage reading on the multimeter, as shown in the image. This is a clear indication that you need to reverse the probe connections.
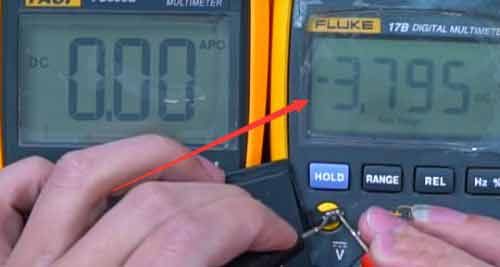
สำคัญ: การเชื่อมต่อที่ไม่ถูกต้องอาจทำให้เครื่องมือที่ละเอียดอ่อนเสียหายได้ ที่ VADE เราเน้นย้ำเรื่องนี้ คำแนะนำด้านความปลอดภัยของแบตเตอรี่ลิเธียม.
| สถานะการชาร์จ (SOC) | แรงดันไฟแบตเตอรี่ (V) |
|---|---|
| 100% | 4.2 |
| 75% | 3.9 – 4.0 |
| 50% | 3.7 – 3.8 |
| 25% | 3.5 – 3.6 |
| 0% | 3.3 หรือต่ำกว่า |
ขั้นตอนที่ 6: การวางตำแหน่งโพรบให้ถูกต้อง
When the probes are correctly placed (red to positive, black to negative), you’ll get a positive voltage reading, as demonstrated in the final image. This indicates a proper connection and an accurate voltage measurement.
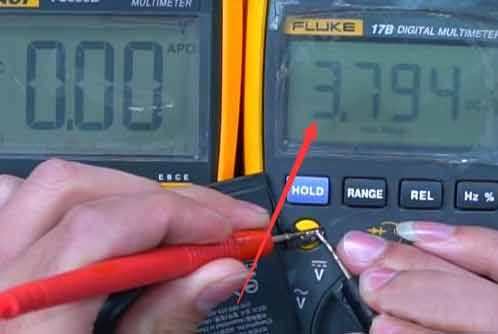
ข้อมูลเชิงลึก: แบตเตอรี่โทรศัพท์มือถือแบบลิเธียมไอออนที่มีสุขภาพดีโดยทั่วไปจะแสดงแรงดันไฟฟ้าระหว่าง 3.7V ถึง 4.2V เมื่อชาร์จเต็ม หากการอ่านค่าของคุณลดลงต่ำกว่า 3.3V อย่างมาก แบตเตอรี่อาจหมดประจุหรือได้รับความเสียหาย
บทสรุป
Mastering the use of a multimeter for battery voltage testing is an invaluable skill for both professionals and enthusiasts. While these tests provide valuable insights, remember that voltage is just one aspect of battery health. For critical applications or if you’re unsure, it’s always best to consult with a professional or use specialized battery testing equipment.
สำหรับผู้ที่สนใจเรียนรู้เพิ่มเติมเกี่ยวกับเทคโนโลยีแบตเตอรี่หรือสำรวจโซลูชันแบตเตอรี่แบบกำหนดเอง โปรดเยี่ยมชมเว็บไซต์ของเราที่ แบตเตอรี่ VADEทีมผู้เชี่ยวชาญของเราพร้อมช่วยเหลือคุณในเรื่องความต้องการพลังงาน ไม่ว่าจะเป็นเซลล์ 18650 ประสิทธิภาพสูงหรือโซลูชัน LiFePO4 ที่กำหนดเอง


