-
29 W. Pawnee, Bloomfield, NJ 07003
Expert Guide: Installing and Maintaining XT60 and XT90 Connectors for Maximum Battery Life and Safety
Proper connector selection and installation significantly impact the performance and longevity of custom battery packs. Among the various components in battery systems, connectors often receive less attention than they deserve despite their critical role in determining power delivery efficiency and overall system safety. XT60 and XT90 connectors serve as essential links in battery setups across numerous applications, from drones and RC vehicles to electric vehicles and industrial equipment. This comprehensive guide examines best practices for installing, maintaining, and troubleshooting these important components to ensure optimal performance and safety in your battery applications.
What Are XT60 and XT90 Connectors?
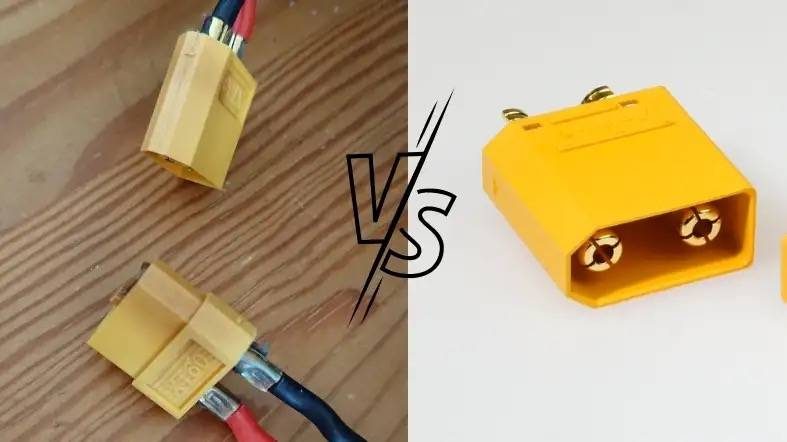
XT60 and XT90 connectors are high-performance electrical connectors designed for applications requiring reliable power transfer. The numbers in their names indicate their current-carrying capacity, with XT60 handling up to 60-75 amps and XT90 handling 90-120 amps continuous current. These robust connectors feature secure locking mechanisms that prevent accidental disconnections during operation.

The key difference between these connectors lies in their size and power handling capabilities. XT90 connectors are larger and heavier than their XT60 counterparts, making them ideal for high-power applications like electric vehicles and industrial equipment. XT60 connectors, being smaller and lighter, are better suited for applications where space and weight considerations are important, such as drones and RC vehicles.
Professional Installation Techniques
Soldering Process for Optimal Connections
Proper soldering technique is crucial when installing XT60 and XT90 connectors. I always start by preparing my workspace with a high-quality soldering iron capable of reaching temperatures above 400°C to ensure effective heat transfer. This high temperature is necessary because these connectors have large contact surfaces that quickly absorb heat.
Before beginning the soldering process, I slide heat shrink tubing onto the wire and position it far enough away to prevent premature shrinking from the soldering heat. Pre-tinning the wire ends is essential to ensure they fit properly into the connector while providing excellent electrical contact.
Wire Gauge Selection for Different Current Ratings
The wire gauge you select must match the current requirements of your application. For XT60 connectors handling up to 60 amps, I typically recommend 12-14 AWG silicone wire for most applications. For XT90 connectors and their higher current capacity, 10-12 AWG wire is more appropriate to prevent voltage drop and overheating.
You can find our complete wire size recommendations in our battery cable size guide. Remember that undersized cables can lead to significant power loss and potential safety hazards.
Heat Shrink and Insulation Best Practices
Proper insulation prevents short circuits that could damage your battery or create safety hazards. After soldering, I always ensure connections are protected with high-quality heat shrink tubing that extends beyond the connector’s base. This provides strain relief and environmental protection.
For applications exposed to moisture, additional waterproofing measures are essential. While standard XT60 and XT90 connectors aren’t inherently waterproof, you can enhance their water resistance using waterproof enclosures, specialized electrical grease, or waterproof sealants.
Anti-Spark Techniques During Installation
Spark prevention is crucial when working with high-current battery connections. I recommend using anti-spark XT90-S connectors for high-power applications, which feature a pre-charge circuit that eliminates sparking during connection. For standard connectors, connecting the negative terminal first and disconnecting it last reduces spark risk.
Learn more about handling high-voltage connections safely in our lithium battery safety guide.
Tools and Equipment for Professional Results
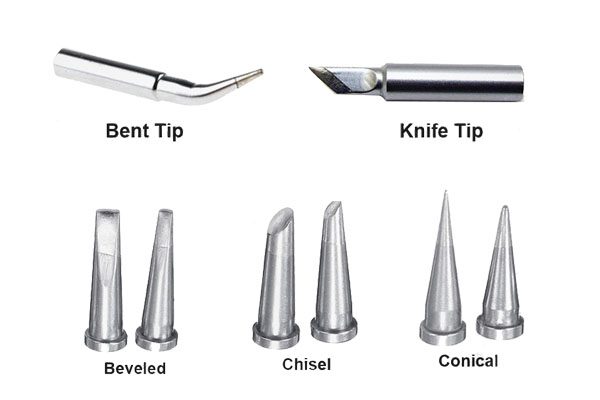
Professional installation requires the right tools. I find that a large soldering tip (Type C) works best for XT60 and XT90 connectors as it fits perfectly inside the rounded connector and transfers heat efficiently. A high-wattage soldering iron (80-100W) ensures quick heating without damaging the nylon housing.

Other essential tools include helping hands or a vice to secure connectors during soldering, a good wire stripper, quality heat shrink tubing, and a multimeter for testing connections. For testing high-current applications, consider investing in a load tester as detailed in our battery load testing guide.
Connection Quality Testing and Verification
Resistance Measurement Techniques
Low connection resistance is vital for efficient power delivery and preventing heat buildup. I regularly measure the resistance across newly installed connections using a high-quality multimeter with milliohm resolution. A properly installed XT60 or XT90 connector should show very low resistance, typically less than 0.005 ohms.
High resistance readings indicate poor connections that will waste power and generate excessive heat during operation. Test results showed that among various connector types, properly installed XT60 connectors perform exceptionally well, even better than expected when compared to their XT90 counterparts in some situations.
Thermal Imaging for Connection Quality Verification
One of my favorite verification methods involves using thermal imaging during a load test. Even connections that measure well with a multimeter can develop hot spots under load. I recommend applying 50-75% of the rated current for several minutes, then using a thermal camera to check for uneven heating.
Quality connections will heat evenly and stay relatively cool, while poor connections develop hot spots that can be easily identified with thermal imaging. Learn more about thermal management in our energy density batteries guide.
Load Testing Procedures for High-Current Applications
For critical high-current applications, I perform comprehensive load testing to verify connector performance. Testing has shown that under high current loads, connectors get warm but should not become painful to touch. The XT60 and XT90 connectors will typically feel the warmest as current passes through them twice during testing.
Monitoring voltage drop during load testing provides valuable insight into connection quality. Minimal voltage drop indicates an efficient connection, while significant drops signal resistance issues that need addressing before deployment.
Common Installation Errors and How to Avoid Them
The most frequent error I encounter is insufficient heating during soldering. When the connector isn’t thoroughly heated, solder doesn’t flow properly, creating cold joints that fail prematurely. Always ensure the connector is hot enough for solder to flow freely while keeping heating time minimal to protect the nylon housing.
Another common mistake is melting the connector housing due to excessive heat application. Using a heat sink by plugging in another connector before soldering helps protect the contacts and prevents them from moving as the housing gets hot.
Quality Verification Checklist
Before finalizing any installation, I verify:
- Physical security of the connection (no movement when tugged)
- Proper solder flow with no visible cold joints
- Heat shrink coverage extending beyond strain points
- Low resistance readings across the connection
- Minimal heating under normal operating loads
- Proper polarity verification (crucial for preventing damage)
Complete this verification process to ensure your connections will perform reliably over time in your custom lithium battery pack.
Preventative Maintenance for Long-Term Reliability
Regular Inspection Guidelines for Different Environments
Environmental conditions significantly impact connector longevity. In clean, controlled environments, I recommend visual inspections every 3-6 months. For outdoor or harsh environments, monthly checks are more appropriate.
Pay special attention to connectors used in humid or coastal environments, as corrosion can develop rapidly. For marine applications, consider our recommendations for battery terminal corrosion prevention.
Cleaning Procedures for Maintaining Optimal Connections
Keeping connectors clean ensures optimal electrical contact. For light maintenance, I use compressed air to remove dust and debris. For more thorough cleaning, a small amount of electronic contact cleaner on a lint-free cloth works well for the external surfaces.
Never submerge connectors in cleaning solutions, and always ensure they’re completely dry before reconnecting. Moisture trapped inside can lead to corrosion and connection failures over time.
Early Warning Signs of Connector Degradation
Catching problems early prevents catastrophic failures. Warning signs include discoloration around contact points, intermittent power delivery, connectors that feel unusually warm during operation, or visible melting of the connector housing. These symptoms indicate it’s time for connector replacement.
If you notice any darkening on male connectors or melting at connection points, this suggests the connector has overheated at some point and requires immediate attention.
Replacement Timing Recommendations
Even the best connectors have a finite lifespan. I typically recommend replacing XT60 and XT90 connectors every 12-18 months in frequently used high-current applications. For less demanding or occasional-use applications, replacement every 2-3 years is usually sufficient.
Always replace connectors showing any signs of damage, overheating, or degraded performance regardless of age. Learn more about lifecycle considerations in our guide to lithium ion battery basics.
Environmental Protection Strategies
While standard XT60 and XT90 connectors aren’t fully waterproof by default, you can enhance their environmental protection. For outdoor installations, I recommend waterproof enclosures that shield the connection points from direct exposure to moisture.
In environments with temperature extremes, ensure connectors aren’t subjected to forces from thermal expansion of cables by providing adequate strain relief. This prevents stress that can break solder joints over time.
Troubleshooting Connection Issues
Diagnosing Voltage Drop Problems
Excessive voltage drop across connectors indicates resistance problems that waste power and generate heat. I use a digital multimeter to measure voltage on both sides of the connection under load. Drops exceeding 0.2V at rated current suggest a problem requiring attention.
For more detailed power analysis, consider the methods outlined in our watts battery power measurement guide to identify efficiency losses in your system.
Identifying and Fixing Intermittent Connections
Intermittent connections are frustrating but usually fixable. If you’re experiencing power fluctuations, first check for physical security of the connection. Sometimes, the brass contacts inside the female connector can spread slightly, resulting in poor contact.
A simple fix involves carefully inserting a thin knife blade into the inner areas of the brass connections to slightly spread these connectors, allowing them to make better contact. For a more permanent solution, replacement is recommended.
Thermal Management Challenges in Compact Installations
In tight installations, heat dissipation becomes critical. XT connectors generate heat under load, and without adequate airflow, this heat can build up, potentially damaging the connector and surrounding components. I ensure at least 1-2 cm of clearance around connectors wherever possible.
For high-current applications in confined spaces, consider our recommendations in the lithium battery for your e-bike guide, which addresses similar thermal management challenges.
When and How to Upgrade Inadequate Connections
If your application consistently pushes your connectors to their limits, it’s time to upgrade. I recommend upgrading from XT60 to XT90 when current demands exceed 50A continuously or 60A intermittently, providing a safety margin below the absolute maximum rating.
When upgrading connectors on existing systems, remember to update all mating pairs and ensure wire gauges are appropriately sized for the higher current capacity. Learn more about properly matching components in our series-parallel battery configurations guide.
Emergency Field Repair Techniques
In emergency situations, temporary repairs can get you operational until proper maintenance is possible. For damaged housings, high-temperature silicone or moldable glue like Sugru can provide temporary insulation and mechanical support.
For loose connections, a rubber band strategically placed to hold the connector at the correct angle can maintain electrical contact in a pinch. These are temporary fixes only—plan for proper replacement as soon as possible.
Ensuring Long-Term Battery Performance Through Quality Connections
The proper selection, installation, and maintenance of XT60 and XT90 connectors significantly impact battery system performance, safety, and longevity. These often-overlooked components can make the difference between a reliable system and a frustrating experience for users.
When selecting connectors for your application, match the specifications to your specific requirements. XT60 connectors excel in moderate-power applications where size and weight are important considerations, providing current handling up to 60-75 amps in a compact form factor. XT90 connectors are the appropriate choice for high-current systems where performance is paramount, handling 90-120 amps continuously.
By following the installation techniques, testing procedures, and maintenance practices outlined in this guide, you can ensure reliable connections that maximize efficiency and minimize potential issues in your battery systems. Regular inspection and preventative maintenance will extend the life of your connectors and help safeguard your entire battery installation.

