-
29 W. Pawnee, Bloomfield, NJ 07003
How to Use a Multimeter to Test Mobile Phone Battery Voltage
As a VADE Battery engineer specializing in custom rechargeable battery solutions, I’m excited to share our expertise on testing mobile phone battery voltage. This crucial skill helps diagnose battery health and optimize device performance. Let’s follow the step-by-step process demonstrated by Vade Battery manufacturer, with additional insights from our experience in lithium-ion, LiFePO4, and custom battery pack manufacturing.
Tools and Materials Needed
- Multimeter
- Mobile phone battery
Step-by-Step Method
Step 1: Set the Multimeter for Non-Scaled Devices
If you’re using a multimeter without scales as shown in the image, simply set the dial to the DC voltage position. This setting is suitable for most basic voltage measurements of mobile phone batteries.
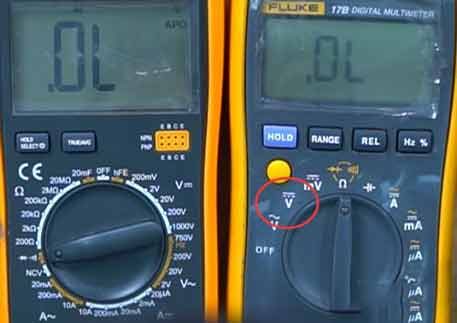
Pro Tip: At VADE Battery, we use high-precision multimeters for our custom lithium battery manufacturing process, ensuring accurate readings every time.
Step 2: Adjust for Scaled Multimeters
For multimeters with scales, set the dial to 20V DC voltage. This range adequately covers most mobile phone batteries, which typically operate below 20V.

Note: Our 18650 battery packs are tested within this range to ensure optimal performance.
Step 3: Identify Probe Polarity
Next, familiarize yourself with the test probes. As shown in the image, the red probe is positive, and the black probe is negative. This color coding is standard across most multimeters and is crucial for accurate measurements.

Safety Reminder: Always handle probes with care to avoid short circuits, a practice we strictly follow in our battery load testing procedures.
Step 4: Connect Probes to Battery Terminals
Carefully touch the probes to the battery’s terminals, as demonstrated in the image. Ensure proper contact with the positive and negative terminals.

Enhancement: Before testing, clean the battery terminals with isopropyl alcohol. This practice, which we use in our LiFePO4 cell balancing procedures, ensures accurate readings.
Step 5: Observe Negative Voltage Reading
If you’ve connected the probes incorrectly, you’ll see a negative voltage reading on the multimeter, as shown in the image. This is a clear indication that you need to reverse the probe connections.

Important: Incorrect connections can potentially damage sensitive equipment. At VADE, we emphasize this in our lithium battery safety guidelines.
| State of Charge (SOC) | Battery Voltage (V) |
|---|---|
| 100% | 4.2 |
| 75% | 3.9 – 4.0 |
| 50% | 3.7 – 3.8 |
| 25% | 3.5 – 3.6 |
| 0% | 3.3 or below |
Step 6: Correct Probe Placement
When the probes are correctly placed (red to positive, black to negative), you’ll get a positive voltage reading, as demonstrated in the final image. This indicates a proper connection and an accurate voltage measurement.

Insight: A healthy lithium-ion mobile phone battery typically shows a voltage between 3.7V to 4.2V when fully charged. If your reading falls significantly below 3.3V, the battery may be deeply discharged or damaged.
Conclusion
Mastering the use of a multimeter for battery voltage testing is an invaluable skill for both professionals and enthusiasts. While these tests provide valuable insights, remember that voltage is just one aspect of battery health. For critical applications or if you’re unsure, it’s always best to consult with a professional or use specialized battery testing equipment.
For those interested in learning more about battery technology or exploring custom battery solutions, visit our website at VADE Battery. Our team of experts is always ready to assist with your power needs, from high-performance 18650 cells to custom LiFePO4 solutions.

